As soon as I get a few spare minutes, I’m dying to try these sewing tutorials!
Ruffled Camera Strap from Crap I Made

Jazzy Ironing Board Cover from Sew4Home


This is by far, the easiest tutorial I’ve seen for making Pettiskirts.
Happy Sewing!

THE DOMESTIC DIVA'S DISASTERS™
the not so Domestic Diva
As soon as I get a few spare minutes, I’m dying to try these sewing tutorials!
Ruffled Camera Strap from Crap I Made
Jazzy Ironing Board Cover from Sew4Home
This is by far, the easiest tutorial I’ve seen for making Pettiskirts.
Happy Sewing!
Can’t believe Christmas is right around the corner! Here’s a few things to make for the holidays!
I love this method to making stockings! How clever!
What a quick and easy project. All you have do is be able to sew a straight line.
With an embroidery machine, you can personalize it~
These socks are simple to sew. I’ve made dozens over the years.

Check out this quick Crown Tutorial by Jessica Levitt. Also be sure to take a look at her gorgeous new fabric line, Timber.

Need a gift for your favorite Shutterbug? How about this neat Patchwork Camera Strap?

Love this easy Laptop Sleeve tutorial! I really need to make one of these for Marielle.
Hope everyone is doing well!


EDITED: WE HAVE A WINNER
True Random Number Generator Result: #19
Erica is the winner of the Silk Spider Web Rose Kit. Please email me at domesticdiva@si.rr.com with your full name and mailing address!
Congrats!
I’ve made dozens of tiny silk ribbon spider web roses, but I needed something BIG for the front of a Christening gown. And they say, bigger IS better, so I made these simple roses and thought you, too, would like to make them. As an incentive to get you to try this easy tutorial, I’m giving away a kit with all the supplies you need to make these roses yourself.
Ok…so let’s get started!
Supplies Needed
First let me say, you can make your silk rose as big or small as you want. It all depends on:
I made a quick video tutorial to help. Written instructions can be found below.
Laying the Foundation
Hoop some background fabric in your embroidery hoop.
Now decide how big you want your rose to be. Take any circular item such as a can, cup or small container. Trace it onto the hooped fabric using a pencil or disappearing ink pen. Mark 5 points in the shape of an upside-down star and your center point like this:

Thread your needle with matching thread. Come up at point A. Go down at point B. Come up at the center point (pictured below)catching the A-B thread:
Go down at point C creating a fly stitch:

Now come up at point D and down at the center point. Then come up at point E and down and the center point. Now tie a knot on the underside (don’t cut the thread off just yet). You’ll now have 5 spokes.
Creating the Rose
To make a fabric strip, cut into the selvage edge of the fabric and tear it to the other selvage edge. You want frayed fabric strips…adds more character…LOL. Take your fabric strip and secure one short end to the center of the star using the needle and thread. Leave your needle and thread on the underside of the hoop. You’ll need it at the end to secure your rose to the foundation fabric.
Now attach a safety pin to the other side of your fabric strip. This will enable you to easily thread the fabric strip through your spokes.
Start weaving your fabric strip over and under the spokes in a circular motion. Keep twisting your fabric strip as you create the rose.
Once you have covered all of your spokes, complete the rose by tucking the end of the fabric strip under the rose and removing the safety pin.
Using the needle and thread that is attached to the underside of your hoop, secure the rose with a few stitches.
Cut out your finished rose making sure NOT to cut your foundation spokes. Sew it to a garment, glue it to a hair clip or use it to decorate a tote. The options are endless. You can even create these roses directly onto your items.
Now, don’t think you can only make these roses with silk fabric. Try quilter’s cotton, chiffon, organza, cotton knit, velvet, beaded satin, spandex or even tulle.
Various Uses for Silk Spider Web Roses
Silk Spider Web Rose Kit Giveaway
To win the supplies you’ll need to make these roses, post a comment and I’ll use a random number generator to pick the winner on Friday!
I’d love to see the roses you make, so please post a link and share your pics!


I should have smacked myself upside the head. I’d had a month to get the Christening gown for Sophia completed, but ended up finishing it just a few hours before her Baptism.
Beyond my usual procrastination, I have a habit of “designing as I go.” I usually have an idea of what I want it to look like. However, I continually change design elements and always end up with something totally different from my original design. Am I the only one who does this?

Working with silk shantung is challenging to say the least. And trying to set the tiniest gathered sleeves is beyond nerve-wracking!
Then I sewed lace and tatting to tulle. At least I was smart enough to do it flat (before sewing up the side seams of the skirts).

But the worst was trying to gather 6 skirt layers (1 cotton batiste, 3 tulle, 1 netted lace and 1 silk shantung overskirt) and attach them to the tiny silk shantung bodice.

Whew! DONE! To give you an idea of size…this dress bodice is a size 3 months…LOL! It just looks bigger in photos. Ok, so the dress is huge…I think it measures about 48 inches. And oh my…it was HEAVY!

At the last minute, I decided to do these silk dupioni spider web roses. I’ll post a quick tutorial this week (once I get another manicure), so everyone can make some, too.

To make dressing the baby easy, I used large sewn-in snaps and covered them with no-functioning rhinestone buttons.

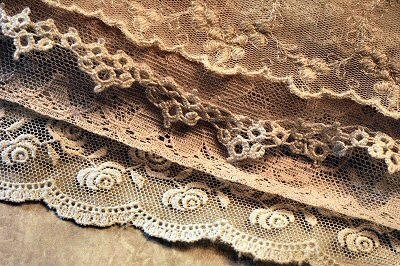
Here’s a close-up of all the skirt layers. I’ve made several special occasion dresses, but never a Christening dress. This was a first. I’ve been collecting vintage laces and tatting for ages and loved using them for such a precious little girl!

Meet Sophia, daughter of my dear friend, Diana (aka Diana of Not Just Bagels)! The Christening gown fit Sophia perfectly! It was such a feeling of accomplishment to see Sophia in the Christening dress.

Sophia enjoyed sucking on the big silk roses. Isn’t she beautiful?

Diana loved the dress and is going to put it in a huge shadow box to display in Sophia’s room.
Wishing everyone a Happy 4th of July!

PLAYING WITH LACE

I was so terrified honored when my dear friend, Diana (you know, the one who made all the delicious caramels apples for the big BBQ), asked me to create the perfect Christening gown for her new daughter, Sophia.
She decided on a simple an over-the-top ivory silk shantung gown with an underlay of vintage lace.

Diana is even going to let me add a big vintage pink silk sash which will be tied into a big bow on the back of the dress and embellished with Swarovski crystals. Luckily, I have one of those cool hot fix crystal tools from Hot Fix Suzy™!

As much as we both loved the alençon lace, it was too glitzy for the Christening gown we’ve envisioned.

We decided on the perfect lace which has a soft hand.

The abundant tulle underskirt layers will be trimmed with various vintage laces…some ivory and some pink!

But before I can start on the Christening Gown, I’ll need to tidy up my sewing room…ugh! Prior to sewing any special occasion dress (especially whites), I always give my sewing room the Mr. Clean treatment. DONE!
Seems I started 14 pair of lounge pants for my daughter, 7 onesies for above new baby and various other sewing projects. Off they all go to the UFO (Un Finished Objects) pile…LOL!
Sophia’s Christening is June 28th…so I had better get moving!
UNIQUE PATTERN MAKING

Kathleen of Fashion-Incubator recently posted about a defunct company, East-West Musical Instruments Co., which created the most unique leather jackets. These jackets are a work of art.

And wouldn’t you know, I’ve had this beautiful one they created back in the 70s. It was given to me by my childhood housekeeper who received it from Edgar Winter.

I certainly made a fashion statement as a teenager as everyone went nuts when they saw this silver leather jacket. I didn’t realize it was valuable. Check this one out. Elvis’ jacket went for over $30,000! It is marked jacket #432, I believe!

I can’t imagine the hours of pattern making and sewing that went into creating this masterpiece.

HAPPY BIRTHDAY TO ME

Last week, I celebrated my 46th birthday (May 22nd) with a delicious Mocha Butter Cream cake (thanks to my sister, Linda). I had cake for breakfast, lunch and dinner for two days..haha!

And no…that’s not my front lawn above…although it is not below me to get one of those! I did, however, display the obnoxious amount of fresh flowers Mr. Diva surprised me with in the front window. It pisses off all the other housewives in the neighborhood.
Now to get to work…hope everyone is having a great week!
With friendship,
Lisa

Yesterday, the House Small Business Committee, Subcommittee on Investigations and Oversight held a hearing on The Consumer Product Safety Improvement Act and its impact on small businesses.
Rick Woldenberg has a post up about the hearing and subsequent press release of the committee.
In other news, the CPSC voted yesterday on NAM’s request for stay of enforcement on Tracking Labels. It was a split decision between Nancy Nord and Thomas Moore…ugh! That means it was denied! NAM says labeling fosters confusion. More posted on Amend the CPSIA here.
Oh…I’m missing Quilt Market with Lady M™ and Mary the Craft Addict™ this weekend! I should be there in Pittsburgh, but I’m not. DRATS!

And a big HAPPY BIRTHDAY to Patty Young (aka ModKid Boutique)! She, too, will be at Quilt Market (Booth #2531) having a blast without me! Be sure to stop by her booth and check out her new Mezzanine fabric line for Michael Miller!
With friendship,
Lisa


With Easter just one short week away, I thought I’d share some Easter Basket sewing tutorials found around the web:
J. Caroline Creative’s Easter Basket Tutorial
Dabbled’s How to Make a Fabric Basket
Retro Mama’s Fabric Easter Eggs
Embroidery Library’s Fabric Easter Basket Tutorial
Cranston Village’s Easter Bunny & Chick Baskets
Speaking of Easter Baskets…I received an awesome Easter SWAP from Heather of Little E Designs!

OMG! I love the zebra basket!

Filled with all my favorite sweets…DOTS, Milk Duds, Yellow Bunnies PEEPS, caramel eggs and lots more!

Heather even made me an adorable bookmark! Thanks Heather!


I know everyone in the children’s business is jumping for joy. I’m not–at least not yet. The CPSIA problems are far from over. The CPSC has issued a “stay of enforcement” meaning they aren’t going to enforce the new CPSIA law just yet. However, they are allowing your state’s attorney general to do so.
The law still applies. The CPSC, however, is not requiring third-party testing at this time. Yet, you are still not allowed to sell children’s products outside of the new lead limits. Seems the law hasn’t changed–just the testing requirements and enforcement for the time being (and only Congress can change the law, not the CPSC).

Another thought that comes to mind is wholesale accounts (children’s boutiques). I seriously doubt boutiques want the liability and will want some type of proof that your children’s products are lead-free. They’ll want to have all incoming stock to be certified prior to any amendments in the law as they are unsure how this will all play out. Stores won’t want to add products that might not be sellable in the future.

I’ve decided to go ahead with my XRF lead testing tomorrow and have GCCs issued to ensure the safety of my boys’ clothing line. It will only add value to my products as not all of my competitors are doing so.
Now for some CPSIA links around the web:
National Bankruptcy Day: Cautious Optimism
Overlawyered.com CPSIA Stay: Part I
Overlawyered.com CPSIA Stay: Part II
CPSIA Cheer: Touchdown! We Scored! But It’s Not Even Half Time
Senator Hatch Wants Senate Hearings on CPSIA
WhatDoISell.com: Temporary Relief
Boutique Cafe: Breathe Easily and then Call Your Representatives from Heather of Lilliputians
Kenneth Ross, Attorney at Law: Summary of CPSIA Stay
Scholars and Rogues: No Child Product Left Behind
How Much Safer Will CPSIA Make Us?
Nancy Nord of CPSC: Letter to Congress regarding Stay
I think what everyone should be doing at this point is contacting your local members of Congress and ask them to support Congressman DeMint’s Bill to amend the CPSIA.
One last thing, my mentor, Kathleen Fasanella of Fashion-Incubator.com, deserves a big THANK YOU from me and the rest of the children’s apparel industry. Kathleen has worked countless hours (and continues to do so) on the CPSIA and its affects on sewn products. I don’t know what I would do without her. Seriously.

DORKA THE EXECUTIONER by wacky artist David Gross
Hope everyone’s enjoying a wonderful weekend! I know Mr. Diva will be. He and his passe are awaiting the limo to take them to Atlantic City, NJ for Super Bowl Weekend. Oh, what a wonderful wife I am–LOL!

Disclaimer: Although I consider myself extremely bright, I have no legal background (other than a paralegal certificate…LOL) and therefore, the above post reflects my personal opinion and should not be construed as legal advice.

Good news–I’m scheduled to test (via XRF testing gun) my Spring/Summer 2009 Downtown Joey boys’ clothing line this weekend! I don’t foresee any problems as all my fabric is 100% cotton and my components (zippers, snaps, etc.) are from reputable suppliers. My only concern are my key chains. We shall see. Wish me luck!
In the meantime, I wanted to share with you some more great CPSIA links to keep you busy this weekend:
NAM Petition Request Delay of February 10th CPSIA
Fashion-Incubator’s Crystal Ball and Status Report
Fashion-Incubator: How the Industry has Changed Forever
Some Really Great Advice for CPSIA – Polkadot Patch Baby
CPSIA: My Wish List by Rick Woldenberg
CPSIA: Some Random Thoughts by Rick Woldenberg


