Ummm…it doesn’t get more compact that this…LOL!
The Original Scrapbook Company
With friendship,
Lisa
![]()
THE DOMESTIC DIVA'S DISASTERS™
the not so Domestic Diva
Ummm…it doesn’t get more compact that this…LOL!
The Original Scrapbook Company
With friendship,
Lisa
![]()

Irene of Mushroom Villagers asked what to do with all her fabric scraps, so I added some ideas on organizing fat quarters, fabric scraps and even fabric bolts to The Sewing Room Organization Challenge – Part I – Fabric Organization. Check it out!
Wishing you a fabulous weekend!

NOTION COMMOTION

In addition to your Sewing Room, any of these organization ideas can be used in your Craft Room, Scrapbooking Corner and/or Jewelry Making Studio. Get creative!
Ok…it’s time to get back to work! We have a few little things we need to still need to organize, so let’s get started.
CLOSURES
There are literally dozens of ways to fasten a garment or home décor item. Get yourself some clear containers or cheap photo boxes and start sorting your closures. Make sure you label each container and stack it on your shelves. Here’s how I divide them:
Buttons, Snaps, Eyelets, Grommets, Hooks and Eyes
ZIPPERS

Teresa Franco’s awesome zipper storage idea
You could also organize your zippers with safety pins, but instead put them on a tie rack:

Revolving Tie Rack from Harriet Carter

Just bought my husband this motorized revolving tie rack. Think he’d mind if I borrowed it for my ribbon? LOL

Brookstone Motorized Revolving Tie Rack
BUTTONS, SNAPS, EYELETS, GROMMETS, HOOKS AND EYES
There are literally hundreds of ways you can organize these small objects. I store my snaps and buttons in these See n Store magnetic containers:

I currently have 36 of these nifty containers and plan to add more as needed. They can be mounted on the wall or free-standing and in a variety of combinations:

5 Tin Magnetic Standing Storage at Organize.com
5 Tin Magnetic Hanging Storage at Organize.com
8 Tin Magnetic Standing Storage at Oriental Trading


Kamenstein Magnetic Spice Rack

Making Memories Modular Storage System
If you’re trying to keep costs down, Make Your Own Magnetic Storage Board. You only need FOUR things to make this quick and easy board to hold your sewing and craft notions:
1 -STEEL SHEET
2 – SMALL METAL CONTAINERS
3 – MAGNETS
4 – GLUE
Have your husband or dad drill four holes in the corner of the steel sheet/board for mounting, if desired.
Hang sheet/board on wall or store in drawer.
Glue a magnet to the back of each container. Let dry.
Stick magnetic containers to sheet/board. Done!

Martha Stewart adds Buttons to her Magnetic Containers

Add a photo to your containers if you’d like.
Additional magnetic board tutorials:


Lowe’s Magnetic Board Tutorial
Other clever storage ideas:


Deflecto Revolving Clear Storage at Shoplet.com


Economical Glass Jars by the Case


ArtBin 24 Compartment Slide ‘n Store


Snap or Button Organizer from Stacks n Stacks


You could also use a rail system installed on your wall:

and add the coordinating wire basket and/or containers:

I absolutely love my Deflect-o Tilt Out Storage Bins. They are my favorite storage system in my sewing room:

These bins come in all different sizes to suit your needs and lock together. They can be mounted on the wall or placed on a shelf:

Deflect-o Tilt-Out Clear Storage Bins at TheNerds.com
Deflect-o Tilt-Out Clear Storage Bins from Staples.com

ELASTIC, VELCRO AND SNAP-TAPE
With all the different sizes and applications, it is easy to accumulate a large “stash” of elastic. I sort my elastic into three stacked storage boxes:
Thin Elastic (includes elastic thread)
Foldover Elastic and Decorative Elastic
Waistband Elastic
Here’s my pink leather boxes (once again from Home Goods):

My Velcro and Snap-Tape are stored in similar leather boxes. Any type of storage container, box or drawer will work:


Clear Acrylic Stackable Storage Drawers


Foremost Modular Storage Drawer Cubes
You can cover these drawers with either fabric or paper and then use decoupage to seal them:

You can even make erasable labels on each drawer:

MARKING AND CUTTING IMPLEMENTS

Are you constantly trying to find your favorite scissor or disappearing (literally) marking pen? A great solution is to find some type of utensil caddy which can be placed on your cutting table and then moved next to your sewing machine when needed. I found this great revolving caddy (pictured above) at my local Home Goods store.
Check out your local office supplies store in their desk accessories aisle for lots of good ideas.
In this type of caddy, you can store:

Prior to getting my neat revolving caddy, I used to store all my extra marking pens, scissors, tube turners, etc. in leather containers (also found as Home Goods). For the items I don’t want to keep on my cutting table, I use one of these nifty Tupperware Utensil Caddies:

Here’s a few more organizers to consider:


Rubbermaid Rotating Desk Organizer

Donna Dewberry Storage Spinner


Utensil Holder with Adjustable Dividers

If you don’t have the space on your cutting surface or it’s portable, consider hanging your cutting implements on the wall:


Tip: The height of your cutting surface is so important as to avoid an aching back. I use these under the legs of my table:

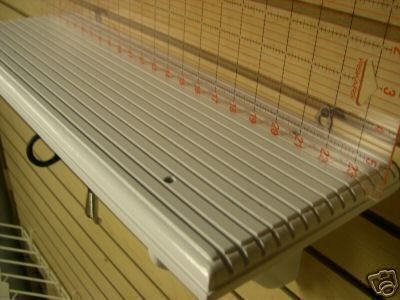
RULERS

I use a wire mesh letter holder from my local office supplies store to hold my rulers at the end of my cutting table. You can easily organize your rulers by either hanging them or standing them up like I do. Here are some ways to do it:


Quilting Ruler Organizer Shelf on Ebay


Stop your Ruler from sliding on fabric. I really works:

If you need a paper ruler to attach to the end of your table, here’s a free printable one. Consider sending this ruler link to those you sew for (family, friends, customers, etc.) to get easy measurements:
SEWING STATION
There are a few things I like to keep next to my sewing machines:

Get yourself a small bowl, container or divided tray (I use a dog dish…LOL) to keep all your necessary sewing supplies next to your sewing machine. You’ll be able to easily find what you need without going through drawers and cabinets.
Here’s some other ideas:


Make your own Sewing Station:

Sewing.org’s Sewing Station Tutorial
Consider purchasing sewing machine and serger cushioned pads (helps with machine vibration) and thread/scrap catchers:

Pedal-Sta’s Sewing Machine Pad w/ Thread Catcher

Clotilde’s Serger Pad and Thread Catcher

Pedal-Sta’s Serger Pad w/ Scrap Catcher

Pioneer’s Serger Pad Thread Catcher at Joann’s

Joann’s Sew Essential Scrap Caddy
You can also make your own:

K Quilts’ Pincushion and Thread Catcher Tutorial

Kezza’s Pincushion and Thread Catcher Tutorial
SEWING MACHINE / SERGER PRESSER FEET
Do you always find yourself looking blanking at a strange sewing machine foot and wondering what on earth is its purpose? Well, then it’s time to sort through them. I have dozens of sewing machine and serger feet. I use a divided pink leather case to easily store my sewing machine feet. If you label each section, it will be easy to locate the one needed.

I keep my serger feet in a divided leather tray:
You can use a cigar box (decoupage it with fabric):

Cigar Boxes on Ebay Express
or any divided box:

Clear Box with Moveable Dividers


Budget 12 Compartment Storage Case
and label it like Mean Jean did:

Mean Jean’s Presser Foot Organizer
You can even use a cutlery tray!
Expandable Bamboo Flatware Tray
A jewelry organizer will also work!
Jewelry Organizer at Stacks n Stacks
or Jewelry Case

You can also purchase a great “foot organizer” from your local sewing dealer or use clear baseball card plastic sleeve protectors in a regular binder:

Home Depot’s Sewing Notions Organizer

Nancy’s Notions’ Presser Foot Storage Cases
Or make your own:

Husqvarna Viking’s Presser Foot Organizer Tutorial

Petit Debutante’s Presser Foot Organizer Tutorial
PRESSING SUPPLIES
Keep a small shelf over your ironing board for your pressing supplies. This would include:

I keep two boxes next to my pressing station. One contains all kinds of fusible tape which I use when I’m taking sewing shortcuts…LOL. In the second box, I store my small pressing aids such as my Ezy Hem Guide, Iron Cleaner and Point Turner.

I hang both my Tailor’s Board and Sleeve Board on the wall next to my ironing board.

I purchased one of these Slim Drink Dispensers to keep water (holds a gallon!) next to my ironing board. It saves me dozens of trips back and forth to the sink to refill my iron!
You could also use a mounted peg board with hooks to hang all your pressing essentials.
MISCELLANEOUS SUPPLIES
I’m sure you have lots of other supplies which need to be organized and stored. The list seems endless…LOL! Here’s two more great storage ideas I came up with:
First, I re-purposed some doll accessory drawers. These drawers store my size labels, garment labels, bow-making clips, etc.

Next, I came across this neat piano-hinged box at TJ Maxx.

The front cover folds down to reveal my hot fix tool and glues. I glued a piece of cork board sheeting to the inside of the cover to make a nifty little bulletin board:

Since you’re nosey, here’s a close-up of my stickers:

You can get your own stickers here:
Hope your creative space is finally becoming a place to love to be in–not a dreaded space. If you have any ideas for additional sewing room organization topics, just email me!
Happy Sewing!


Oh my…what is the Diva talking about? I would bet you thought I ran out of sewing room organizational tasks. Not so!
Since I started sewing a few years ago, I’ve managed to amass a large collection of literature related to sewing. In my library are design inspirations, reference books and a host of other printed goodies such as project instructions and embroidery designs. And unless you get your sewing literature organized, it becomes just a pile of papers. So let’s get started…
![]()

Let’s tackle your sewing patterns first.
SORT
Start by going through ALL of your patterns. Get some empty cardboard or plastic boxes and attach a label to each indicating the different categories of patterns you have. There are several ways to categorize your patterns such as:
Some may find a combination of the above categories works best. Do what works so you can easily find your patterns in the future. I sew mostly children’s garments and have my patterns categorized as such:
PURGE
Now take one box at a time and go through the sorted patterns. Discard those patterns which are missing pieces, beyond salvaging and/or no longer of interest (no, you are never going to make that toaster cover–get rid of it).
If you aren’t able to part with your patterns just yet, put them in a box (stored outside your sewing room) and write the date on the box. If you don’t touch the box within a reasonable amount of time (6 months or a year), then it’s time to get rid of them–no excuses.
Sell (eBay, Etsy, or Craigslist) or donate the patterns you no longer need (community centers, schools, other sewing enthusiasts).
PRESERVE

Many sewers use the same patterns over and over again. For these patterns, you might want to:

Need to replace a vintage pattern piece or envelope? Visit Pattern Rescue.
STORE
There are those who are able to fit the pattern back in its original pattern envelope–good for you. Once again, I’m not in your club…LOL! Thankfully there are alternatives.
Ways to store:
Plastic Ziploc Bags
Clear Plastic Sleeves
I purchased two boxes of the 3 hole TOP LOADING (this is important–side loading protectors will be useless sheet protectors.

Staples Medium-Weight Clear Sheet Protectors are sold in boxes of 100 or 200. Don’t buy the Staples Economy Sheet Protectors–they are semi-clear and flimsy.

1,000 Sheet Protectors on Ebay

Pattern Saver with Extra Pocket
Pattern Saver at Nancy’s Notions
Binders
I put my patterns in clear plastic top-load sleeves, by category (infants, toddler girls, home décor, etc.) and store them inside big wide binders. I then store the binders on a bookshelf in my sewing studio.


Lots of sewers keep just their pattern envelopes in binders and then store the actual pattern and instruction sheets in boxes or filing cabinets. I prefer to keep the pattern envelopes and its contents all together.
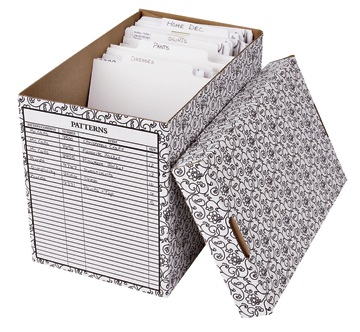
Pattern Boxes
Use pattern boxes available at your local craft stores. Depending on the size of the box, they hold between 30 to 40 sewing patterns.

Pattern Finder™ System at Clotilde
Pattern Boxes at Nancy’s Notions
You can also buy a combo set

Combo Set for 90 Patterns at Nancy’s Notions
Filing Cabinets

Filing Cabinets are a great for holding your pattern stash. You can easily fit 100 patterns per drawer.
Check out this nifty Pattern Organizer with plastic category tabs:

Pattern Organizer for Filing Cabinet
Dressers
What about a beautiful shabby chic dresser? You could store patterns on their sides.

Wooden Crates

Wooden Crate Instructions for your Handy Husband
Clear Boxes
Rubbermaid™ makes clear boxes with high tops. You could store 3 rows of patterns in one box. If you want to save money, visit your local dollar store for a great selection.

Pattern Hooks
I store my most utilized patterns on professional pattern hooks which all hang on a garment rack in my sewing studio.

Over the Door Storage
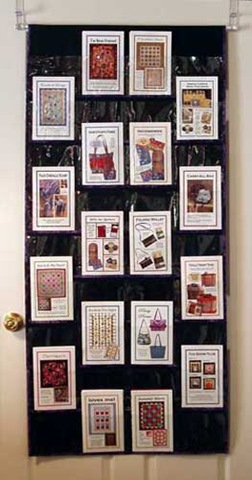
If you have a small pattern collection or want to display your treasured vintage patterns, get the pattern to make these Over the Door Pattern Organizers from By Annie’s. Don’t forget to use a Teflon Foot on your sewing machine when sewing with vinyl.
Pattern Inventory
So, now you that you have all your patterns under control, it’s time to put together a PATTERN INVENTORY list to keep track of those patterns you already own
Create a document in your word processing or database software entitled PATTERN INVENTORY. Make the following columns:
| Manufacturer | Pattern # | Description | Sizes | Binder # |
| McCalls | 9876 | Girls Skirt | 2T-4T | 6 |
| McCalls | 9688 | Boys Shirt | 4-7 | 8 |
Use the SORT feature to organize your pattern information by DESCRIPTION, SIZES or PATTERN NUMBER. With this method, you can easily find the patterns you have using the criteria which best suits your needs.
Other ideas to organize your sewing patterns:
Organized Expressions™ for Sewing
http://www.lns-software.com/sewing/cataloging.html
Wild Ginger software

http://www.wildginger.com/products/stitchnstash.htm
Soul Sista’s Access Database Method for Pattern Storage
http://narcissaqtpie.blogspot.com/2007/05/lets-organize.html
Patterns Wanted
I keep a list of the patterns I want to acquire using Microsoft Word (any word processing or database software will work). Visit some of the sewing patterns sites for the latest selection. My favorite web sites are:
http://www.sewingpatterns.com/
Create a document entitled, “PATTERNS WANTED” with the following columns:
|
Manufacturer |
Pattern # |
Description |
Sizes |
|
Burda |
9799 |
Boys Pants |
4-7 |
|
Burda |
9114 |
Girls Tops |
2-6 |
Do this for EACH pattern manufacturer on a separate page. Then use the software’s SORT function to put each manufacturer’s pattern numbers in ascending order. After you’ve sorted them, condense your list to one page (if possible).
Take your PATTERN WANTED list to the fabric store with you so you can take advantage of the wonderful 99 cents pattern sales. No need to look through those huge pattern books…just access the patterns in the pattern drawers using your newly created list. Be sure to check off those patterns you purchase to keep your list up-to-date for future shopping trips.
![]()
If you are like me, you have dozens…maybe hundreds of embroidery design files on your computer. I use Husqvarna Viking’s 3D Organizer which allows me to find my designs and pictures easily. It also converts embroideries between formats or to images. You can print your designs or create a personal website gallery. You can buy it separately or with the latest version of Husqvarna Viking Embroidery Software bundle.

You can print out indexes and individual design sheets. Organize these design sheets and even your stitched out embroidery design samples in a 3 ring binder. You can sort them by category such as fonts, holidays, girls, boys, etc.
Brother PE Design software has a Design Database included with its software:

Embird has an add-on called Iconizer. It shows a small icon of the embroidery design instead of just the file name and type. This allows you to browse and sort your designs easily, because you can see the contents of embroidery files within Windows Explorer and other Windows programs.

Embird Iconizer Free 30 Day Trial
Ann the Gran offers Catalog Xpress which works with the Ultimate Box™ and the Amazing Box™. Use Catalog Xpress categories, or create your own, then drag-and-drop embroidery designs into them as you download, including to and from your Ultimate Box™ or Amazing Box™.

Catalog XPress at Ann the Gran
Download a free 30 Day Trial at Ann the Gran
BuzzXplore provides you with all the essential tools for organizing and finding your design files. You can locate, print, sort, drag-n-drop, cut, copy, paste, rename, convert, even zip and unzip files.

Purchase BuzzXplore at SMR Software
Pfaff Creative Organizer

Pfaff Creative Organizer quickly converts your embroidery designs to and from most embroidery formats, either individually or by the hundreds. Create a personalized catalog for all of your designs, save your own notes for each design, and add designs to categories using a simple drag-and-drop method.

Babylock Studio Plus available at the Sewing Outlet
Babylock Studio Plus FREE TRIAL
Embroidery Magic software has a built in embroidery design database that comes stocked with 325 stock designs by Pantograms. The Database allows the user to save and retrieve embroidery designs from specific categories.

Embroidery Magic available at Thread Artist
Embroidery Office Book Author is an embroidery design catalog and web page creator that allows you to create design catalogs.

Free Office Book Author Demo Version
OESD Explorations software has a design library built into their software program:

Buy OESD Explorations at All Brands
Here’s some tutorials on organizing your embroidery designs without specialized software:
Secrets of Embroidery Design Organizing Tutorial
George the Digitizer’s Helpful Hints on Organizing Designs
Artistic Threadworks Article on Organizing by Digitizer

Check out the Embroidery Dedupler software. It actual cleans up all duplicate embroidery designs on your computer according to your preferred file embroidery file types. I DEFINITELY am going to purchase this! Available only online!
Embroidery Dedupler at Gran’s Workroom
If you want to put your embroidery designs on CD or disk format to use in your embroidery machine or to back-up your embroidery files you have stored on your computer, you’ll need somewhere to store your CDs and/or disks:
Embroidery CD Holder

Embroidery CD Holder at Nancy’s Notions

Embroidery Design Organizers at Nancy’s Notions
Here’s an adjustable CD holder that attaches to your slatwall or pegboard:

CD and Floppy Disk holders can easily be found at any office supply store.
![]()
These references are a wonderful addition to your Sewing Library. Consider starting a machine specific stitch reference for each sewing machine or serger you own to make your stitch selection a breeze. Create STITCH SHEETS which include information about your sewing machine’s special stitches, sample stitches on fabric, and other pertinent information such as tension settings, stitch length, and stitch width.
My Serger Stitch Workbook has to be one of the most useful tools in my Sewing Library. It includes the techniques and all necessary settings. I even have lots of fabric swatches to show the correct stitch tension. In addition, it includes all proper threading information necessary to easily convert to different stitches. No longer do I have to guess at what different tension settings work with each different fabric.
Store your machine specific workbooks nearby your sewing machines and sergers for easy retrieval.
![]()
I sort all of my various sewing magazines and other periodicals in handy magazine holders which fit neatly in my shelving unit (this bookcase is in my Garden Room so I can peruse them while enjoying a nice cup of coffee). Each different publication has its own holder.

Craft Magazine Sleeves
You can store your sewing and craft magazines in these clear sleeves and keep them in binders.

Craft Magazine Holders at Clotilde
Magazine Sewing Binder

I collect several pattern magazines (Ottobre, BizzKids, Topkids, Patrones Ninos and Burda). Instead of going through each magazine to find a specific pattern, I photocopy or print out (from the web) the index section. I then put the index in a clear plastic sleeve protector. I then add it to my “Magazine Patterns” binder and store it on a bookshelf with my other patterns in my sewing studio.
Free Patterns from the Internet
There are lots of great free patterns on the Internet. Be sure to print them out as they can disappear into cyberspace and be a distant memory.
Again, I put the patterns in clear sheet protectors and then in a binder divided by categories. Here’s some website which have free sewing patterns:
About.com’s Free Sewing Projects
Better Homes & Gardens’ Free Sewing Projects
Free Sewing Patterns at AllCrafts.com
CraftandFabricLinks.com’s Free Patterns
Bella Online’s Free Sewing Projects
All Free Crafts’ Sewing Projects
My Craft Book’s Free Sewing Patterns
Sewing.org’s Free Sewing Projects
Marcus Brothers Textile Free Sewing Projects
Sew More For U Free Sewing Patterns
Free Baby Patterns at Space.com
![]()
I purchased the neatest fashion design tool from Hearth Song. It is a cool set of design elements and textures to create design sketches. I just love it. Check out the Fashion Design Studio Kits…

Hearth Song’s Fashion Design Studio
I keep all my design sketches, pencils and templates in the included handy plastic file case. You can also use a 3 ring binder to organize all your sketches using tabbed file dividers to categorize them.
![]()
There are so many way to sort books. I prefer to sort mine by category:
Another Idea for Organizing Books
Kathleen Fasanella of Fashion Incubator’s wrote a great informational post on How to Organize Books
http://www.fashion-incubator.com/mt/archives/how_to_organize_books.html
Various Book Organizing Software
My Favorite Books
Entrepreneur’s Guide to Sewn Product Manufacturing by Kathleen Fasanella
Sewing for Dummies by Janice Saunders Maresh
New Complete Guide to Sewing by Reader’s Digest Editors
The Ultimate Sewing Book: Over 200 Sewing Ideas for You and Your Home by Maggi McCormick Gordon
Fine Machine Sewing 2nd Edition: Easy Ways to Get the Look of Hand Finishing and Embellishing by Carol Laflin Ahles
Kwik Sew’s Sewing for Baby, Sewing for Toddlers and Sewing for Children by Kerstin Martensson
Serger Secrets by by Mary Griffin, Susan Huxley, Pam Hastings, Agnes Mercik, Linda Lee Vivian and Barbara Weiland
Grandmother’s Hope Chest: French Sewing by Machine, Smocking, Shadowwork & Embroidery by Martha Pullen
Sew Fast, Faster, Fastest: Timesaving Techniques and Shortcuts for Busy Sewers by Sue Hausmann
The Husqvarna Viking FOOT BOOK by Deb Lathrop VanAken
501 Sewing Hints: From the Viewers of Sewing With Nancy by Nancy Zieman
Sewing 101: A Beginner’s Guide to Sewing by Creative Publishing International
Secrets for Successful Sewing: Techniques for Mastering Your Sewing Machine and Serger by Barbara Weiland
Fashion Sketchbook by Bina Abling
Bend-the-Rules Sewing: The Essential Guide to a Whole New Way to Sew by Amy Karol
In Stitches: More Than 25 Simple and Stylish Sewing Projects by Amy Butler
Dream Sewing Spaces by Lynette Black
Shirtmaking: Developing Skills for Fine Sewing by David Page Coffin
Sewing Secrets from the Fashion Industry: Proven Methods to Help You Sew Like the Pros by Susan Huxley
Just Pockets: Sewing Techniques and Design Ideas by Patricia Moyes
Designer Techniques: Couture Tips for Home Sewing by Kenneth D. King
The Complete Step-By-Step Guide to Home Sewing by Jeanne Argent
If you have any additional tips to organize your sewing library, I’d love to hear about them! Happy Organizing!

LACE, TRIM AND RIBBON ORGANIZATION

WARNING
IF YOUR STASH FITS IN EITHER OF THESE,
READ NO FURTHER…
We will only CORRUPT YOU!


For some of us, our lace, trim and ribbon collection is a jumbled pile of knots. As a collector hoarder of polka dot ribbon, vintage lace and tatting, I needed to find a system where I could easily see what I had on hand when inspiration strikes.
SORT
Let’s start by taking a little inventory of our “collections.” Make 3 boxes:
KEEP – Only keep those which you LOVE or will use within the next 2 years.
DONATE – Although you may LIKE these, you’ll never use them. Give them to a friend or charitable group who will. Let’s face it, you are never going to use that 99 cent red foil Christmas trim you purchased from the Joann’s clearance bin 7 years ago!
TRASH – Stained or damaged items which nobody wants. Throw out that water-stained satin ribbon!
Next, you may need to clean your lace and trims if you haven’t already done so. We know to preshrink our fabrics, but many of us forget to do this to our lace and trims (don’t be washing that vintage silk velvet ribbon…bad idea…LOL). This is something I find necessary to do as I am always purchasing vintage trimmings. I love OxyClean to remove stains and rejuvenate vintage items. It may not be the best or safest method, but it works for me.
HOLD
Once laces and trims are washed, give them a quick press (if necessary and/or you are a bit on the obsessive side…LOL) and put them on cards of some type. Check out some of these neat ideas for holding lace, trim and ribbon:
Ribbon Cards by Cropper Hopper come in 3 different sizes. You can put one or several different trims on each card. It has a useful saw tooth slit which holds the ribbon secure.
1 ½ x 3
Love these Ribbon Holders by Sticker Stadium. These hold both wide and narrow ribbon. Starter slit keeps ribbon in place while it’s being wrapped onto the card:

http://www.stickerstadium.com/products.php
You could also use plastic PVC cards:
Try cutting up some white corrugated plastic board:
I also found these neat die-cut ribbon holders in various sizes:

http://savvynsassy.com/shoppe/index.php?cPath=38
Or you could do what I do…make my own. Pretty simple…I use the cardboard from my husband’s dry cleaning shirt packs. I think they are about 8” x 11”.
I fold it in half lengthwise.
Staple the long end with several staples.
Cut into smaller rectangles.
Staple or tape trim to cardboard.
Wrap trim around cardboard and secure.
Check out these adorable one’s made by Sew-Mad. She’s included instructions on her blog:

http://sew-mad.blogspot.com/2006/08/get-organized.html
I keep my ribbon on the roll it came on…too lazy to re-roll it! Many scrapbooking gals re-wrap their ribbons onto round clothespins!
SECURE
You can secure the lace, trim or ribbon to the cards like I do using staples or tape. However, if you want to get fancy, you might want some Ribbon Clips (how many would I need? 500? 1,000? LOL):
Or use tiny plastic or wooden clothes pins!

Check these cool Roll Buddies!
http://www.nmoa.org/PRoducts/rollbuddy.htm
However, there is always the cheapskate way…straight pins! LOL
STORE
Now it’s time to figure out what storage system will work best for you. I use three tall Rubbermaid™ rolling carts with clear drawers for my lace, trim and ribbon stash. Each drawer is labeled making retrieval simple. I even use clear drawer and/or cardboard dividers to keep the rows of laces and trims neat.

You can organize them by Type, Color, Thickness, Texture and/or Patterns (example: all polka dot ribbon in one category, stripes in another, all pink trim together, etc.). Here’s how I’ve sorted mine:
Lace Collection
Tatting
Vintage Lace
Heirloom Lace
Alencon Lace
Lace Scraps
Trim Collection
Light
Medium
Dark
Miscellaneous
Ribbon Collection
Grosgrain – thin
Grosgrain – medium
Grosgrain – wide
Satin/Organza – thin
Satin/Organza – medium
Satin/Organza – wide
Other

Every time I open my Tatting drawer, I drool!

Vintage Laces

One of my ribbon drawers
There are so many different ways to store your stash. Find one that is right for you. Here are some ideas:
JARS
If you have a small collection, you can store your stuff in clear Ball™ Jars. Target also has some cheap glass ones. Either wrap the lace, trim or ribbon around old-fashioned clothing pins or just stack rolled ribbon in the jar itself.
BOXES
Cropper Hopper has these great ribbon boxes in 3 different sizes:
I bought these my local Discount Store. I use them to store thin satin craft ribbon. Each box fits more than a dozen of the thin ribbon rolls:

These are great as the lids stop the ribbon from unraveling:
http://cgi.ebay.com/STORE-IN-STYLE-SCRAPBOOK-CRAFT-RIBBON-ORGANIZER-NEW_W0QQitemZ260145835974QQihZ016QQcategoryZ71229QQrdZ1QQssPageNameZWD1VQQcmdZViewItem
Make your own Ribbon Boxes courtesy of Martha – Begin with a cardboard container (CD storage or photo box). With a utility knife, make a 1/4-inch hole in the center of both short sides. Place ribbon spools in box. Cut a 1/4-inch-thick dowel to length of box, and slide through box and spools; press wide thumbtacks into dowel ends. Cut slits for ribbon, and pull ribbon ends through. For a polished look, attach grommets using a grommet kit (available at hardware stores), and label side of box.
And if you want yours to look as good as Martha’s, just buy hers…LOL:

http://www.marthastewartcrafts.com/detail.php?p=19743&SESSID=92f417be214876bbe8fe33ff97110e24
Or you can make this one from About.com:

http://scrapbooking.about.com/od/gettingorganized/ss/ribbonbox.htm
Instead of making separate holes for each ribbon to slide through like above, consider just making one long slit in the front of the box. You can also cut holes on each short side to insert a dowel. Make sure you leave enough room for the rolls to spin.
Dollar Store Basket – Purchase a rectangle basket that has holes on all four sides. Place ribbons inside and thread ribbon through the holes. It doesn’t get much easier than this!
Here’s a portable one for those who can’t keep their ribbon displayed:
DRAWERS
OMG!!!! How BEAUTIFUL are these Ribbon Lockers? Apparently, they are so popular that they are currently back-ordered!


http://www.craftlocker.com/index.php?main_page=product_info&cPath=1&products_id=1
Check out this gorgeous handmade ribbon drawer:

Perhaps try some of the Sterlite™ rolling drawer units:
RACKS
These professional display racks will work wonderfully if you have an unlimited budget:
http://www.floralsupply.com/cat.cgi?s=CRM-5%20Vertical%20Ribbon%20Rack&c=disp

http://www.floralsupply.com/cat.cgi?s=CRM-5%20Vertical%20Ribbon%20Rack&c=disp
However, instead of shelling out all that cash, why not use an adjustable CD rack?
HANGING HOLDERS
Use a 5 pair metal slacks hanger. Slide the ribbon rolls onto the bar and reattach the latch.

Over the Door Rack (usually used for canned goods or video tapes) are perfect for storing ribbons on rolls:
This Shoe Rack might also work:

MOUNTED HOLDERS
While my mind is in the Gutter, darling Martha is thinking vertical! Use Gutters to keep ribbons and trims organized. Have a lumberyard (or your local home improvement store) cut a half-round copper or plastic gutter to size and add gutter end caps.

Cropper Hopper’s Rail System Holder:

Regular or Magnetic Café Curtain Rods make a great ribbon holder:


What about a Bathroom Towel holder?

A paper towel holder would work, too!

The Ribbon Buddy™ is by far MY VERY FAVORITE (I have two of these)! It can either be mounted to the wall or hung over a door. Best of all, it’s can be brought over to your work surface as it has an A-frame! I use it for all my rolls of tulle and trim (the cheap stuff). During the holidays, I add rolls of wrapping paper, too. I’ve looked everywhere to find these online to no avail…sorry!

Love this one from Organize More as it has no dowels:

http://www.organizemore.com/product.sc?productId=11
Check out this terrific Ribbon Wheel:
You can also purchase a Quick Release Mounting Bar for the above Ribbon Wheel:

The ribbon wheel can also be clamped to a table with these:
Darla Jones’ husband, Ralph, created this awesome Ribbon Wheel which holds 170 – 200 rolls!!! It can be mounted to the wall or a table. WOW! Ummm…Darla, can I borrow your husband? I promise to return him when I’m done…LOL
I adore this Ribbon/Trim Holder Carrin of Rain’s End made for her stash. She even painted it, too! Detailed instructions can be found on her blog:

http://rainsend.blogspot.com/2007/08/ribbon-drawer-organizer-project.html
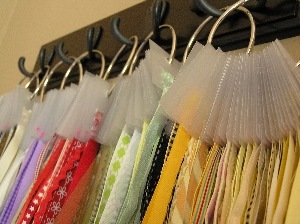
RINGS
A Ring and Header system works great for scrapbooking:
And when you’re ready to use your newly organized stash, perhaps you might want one of these nifty gadgets:

Pebbles™ Ribbon Iron
You could also use a hair straightening iron set on LOW and better yet, a regular iron! The Ribbon Iron would come in handy if you needed portability.
If you have any clever ideas for organizing your lace, trims and ribbons, I’d love to hear about them!
Happy Organizing!

PART II – THREAD ORGANIZATION
Okay girls! Time to move on to NOTION COMMOTION!!! We will start by organizing your mess of threads and bobbins! Here goes…
THREAD
The most basic “notion” would have to be thread. I divide my thread “collections” by type. Consider wooden thread racks which can be wall mounted or placed in a top drawer, clear thread and cone cases, or even Matchbox™ Car plastic storage containers which perfectly fit most embroidery threads. Here’s how I contain my ever-expanding thread collection:
– Regular Sewing Thread: clear thread cases on rolling cart
– Embroidery Thread: clear thread cases on rolling cart
– Serger Thread: clear cone thread cases on rolling cart
Here’s my two rolling carts of clear thread storage…All threads are arranged within their type in color order. It makes finding the right thread for your project a breeze! Be sure to put your thread away in its proper container when you take it out of your machine.
Here’s my friend’s Thread Wall…

The June Tailor Thread Racks come in several different sizes (33, 66 and 120). You can get them with (for placing on a table) or without legs (for wall mounting):

Here’s a neat Matchbox type case:
BOBBINS
I keep my different types of bobbins in separate clear bobbin holders (cases). There are also great bobbin wheels available at your local sewing store.
CLEAR BOBBIN HOLDERS
FOAM BOBBIN HOLDER

MAGNETIC BOBBIN HOLDER

Check out these cool bobbin holders that attach to the top of your thread spool:
Here’s the answer to unraveling bobbins:

Check out Hugo’s Amazing Tape
The best Thread Saver! Keeps embroidery thread and sewing threads from tangling. Also great for bobbins!
Another TIP: I use a waterproof black marker to differentiate the types of bobbin thread. All regular bobbins are not marked, however, I put an “F” on the bobbins used for fine (thin) thread, an “E” for embroidery bobbin thread and an “S” for silk thread.
So girls…you have 72 hours (3 days) to complete this challenge! Please post your BEFORE pictures now and then your AFTER pictures of your newly organized thread storage as soon as you’re done!
Good Luck!


